Setting up a multiple-raspberry pi web server: Part 5 (Tying it all together with HAProxy)
This post is part of a series. To check out the previous posts, see below:
- Part 1: What materials you need to set up a multiple raspberry pi web server
- Part 2: Initial set-up instructions for your Raspberry Pis
- Part 3: Giving your Raspberry Pis static IP addresses
- Part 4: Starting and connecting to a single-node Raspberry Pi web server
By the end of this blog post, we will have (finally) accomplished our initial goal: create a web server powered by multiple Raspberry Pis.
Part 5.1: Understand the goal
In parts 1-4 of these tutorials, I focused primarily on how to set up your Raspberry Pi(s) so they'd be able to respond to requests and would be accessible on your local network. As a result, I haven't spent as much time defining what we're trying to build.
Since this blog post ties everything together, I thought I'd start with a short overview of what I mean by "multiple Raspberry Pi" web server, and why a multi-node web server is useful.
Part 5.1.1 Why not just have a single node web server?
In Part 4, I showed you how to set up a very simple web server that runs on a single Raspberry Pi. It's fair to ask: why didn't we stop there? After all, I can send a request to the Raspberry Pi, and it sends me back a response.
The problem is that if this Raspberry Pi were actually a computer serving requests on the internet for a web site you built, eventually, as your web site gets more popular, it may get more requests than it can handle. At some point, just having a single computer listening and responding to incoming requests may not be enough.
By having multiple computers (or, in our case, multiple Raspberry Pis) handling incoming requests, a web site can handle more incoming requests, and can "scale up" simply by adding more computers (or Raspberry Pis).
Another benefit of having a web site backed by multiple computers is that if one computer goes down but the rest are still working, your site won't go down.
Part 5.1.2: Short intro to load balancing
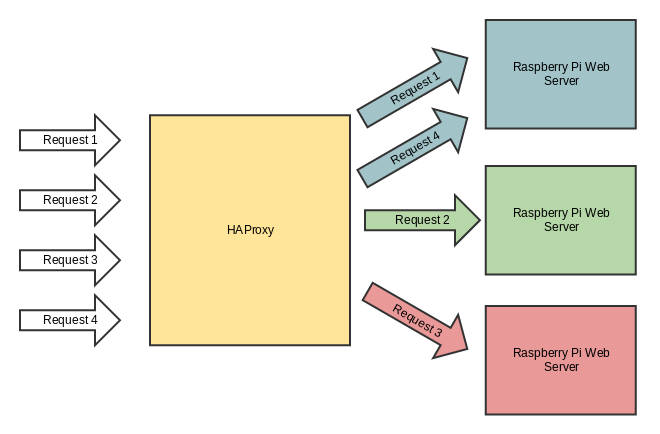
We'll be using HAProxy to load balance incoming requests to a single IP address (ie. website address), so that each request can go to one of several Raspberry Pis behind-the-scenes.
Feel free to read up on HAProxy or load balancing on your own. The HAProxy Starter Guide is a great place to start. However, if you're not feeling like reading a ton, here is a quick excerpt I copied from that guide:
Load balancing consists in aggregating multiple components in order to achieve a total processing capacity above each component's individual capacity, without any intervention from the end user and in a scalable way. This results in more operations being performed simultaneously by the time it takes a component to perform only one. A single operation however will still be performed on a single component at a time and will not get faster than without load balancing. It always requires at least as many operations as available components and an efficient load balancing mechanism to make use of all components and to fully benefit from the load balancing. A good example of this is the number of lanes on a highway which allows as many cars to pass during the same time frame without increasing their individual speed.
Examples of load balancing :
- Process scheduling in multi-processor systems
- Link load balancing (eg: EtherChannel, Bonding)
- IP address load balancing (eg: ECMP, DNS roundrobin)
- Server load balancing (via load balancers)
The mechanism or component which performs the load balancing operation is called a load balancer. In web environments these components are called a "network load balancer", and more commonly a "load balancer" given that this activity is by far the best known case of load balancing.
Tl;Dr: Load balancing in our case will spread out the work to multiple Raspberry Pis.
Tl;Dr Part 2: Look at this picture again:
Part 5.2 Install HAProxy on one of your Raspberry Pis
This part is easy. Pick one of your raspberry pis, and install haproxy using the following command:
sudo apt-get install haproxy
Part 5.3 Start up a web server on the Raspberry Pis without HAProxy
Again, this part is easy, and we should already be comfortable with it after going through Part 4.
All we need to do is start up our basic_node_webserver.js on each of our raspberry pis. Do this by logging into each raspberry pi, and running node basic_node_webserver.js in the same folder as the basic_node_webserver.js file.
You can check to make sure each webserver is running by curling port 8000 on each raspberry pi.
eg:
curl 192.168.1.200:8000
curl 192.168.1.201:8000
curl 192.168.1.202:8000
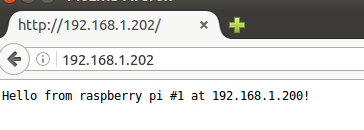
Should return something like:
Hello from raspberry pi #1 at 192.168.1.200!
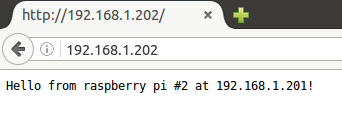
Hello from raspberry pi #2 at 192.168.1.201!
Hello from raspberry pi #3 at 192.168.1.202!
Part 5.4 Configure HAProxy
Ok, where are we at?
- We have
haproxyinstalled on at least one of our raspberry pis (alternatively, you can also just install it on your home computer or laptop) - We have a node webserver running on port
8000on each of our raspberry pis.
Note: We will now essentially be following the steps listed in this excellent HAProxy tutorial. If you want more details on HAProxy, I recommend checking out that page.
The primary difference between this overview and the page I linked above is that we have our servers running on multiple different machines (raspberry pis), instead of on one machine.
With that, let's get started:
- Go to the raspberry pi (or other computer) with HAProxy installed.
- Add a "frontend", "backend", and "stats" section to the
/etc/haproxy/haproxy.cfgfile (this is the HAProxy config file)
Frontend
frontend raspberrypinodes
    bind *:80
    mode http
    default_backend nodes
This part essentially tells HAProxy to listen for incoming HTTP requests on port 80 (the default port for HTTP).
For more context on these config items, or more context on HAProxy in general, please check out the HAProxy tutorial that this is based on.
Backend
backend nodes
    mode http
    balance roundrobin
    option forwardfor
    http-request set-header X-Forwarded-Port %[dst_port]
    http-request add-header X-Forwarded-Proto https if { ssl_fc }
    option httpchk HEAD / HTTP/1.1\r\nHost:localhost
    server raspberrypi01 192.168.1.200:8000 check
    server raspberrypi02 192.168.1.201:8000 check
    server raspberrypi03 192.168.1.202:8000 check
Note that we have chosen a "roundrobin" load balancing strategy. This means that HAProxy will attempt to use each server one after the other in order.
Also note that we have set up each of our 3 raspberry pi web servers, and added their full IP addresses (including port 8000, where all the servers are listening for connections). Make sure that you replace these IP addresses with the IP addresses pointing to your own raspberry pis.
Stats
listen stats *:1936
    stats enable
    stats uri /
    stats hide-version
    stats auth someuser:password
After adding all of these, my /etc/haproxy/haproxy.cfg on the raspberry pi with HAProxy looks like this:
global
    log /dev/log    local0
    log /dev/log    local1 notice
    chroot /var/lib/haproxy
    stats socket /run/haproxy/admin.sock mode 660 level admin
    stats timeout 30s
    user haproxy
    group haproxy
    daemon

    # Default SSL material locations
    ca-base /etc/ssl/certs
    crt-base /etc/ssl/private

    # Default ciphers to use on SSL-enabled listening sockets.
    # For more information, see ciphers(1SSL). This list is from:
    #  https://hynek.me/articles/hardening-your-web-servers-ssl-ciphers/
    ssl-default-bind-ciphers ECDH+AFSGCM:DH+AESGCM:BCDH+AES256:DH+AES256:ECDH+AES128:DH+AES:ECDH+3DES:DH+3DES:RSA+AESGCM:RSA+AES:RSA+3DES:!aNULL:!MD5:!DSS
    ssl-default-bind-options no-sslv3

defaults
    log global
    mode    http
    option  httplog
    option  dontlognull
        timeout connect 5000
        timeout client  50000
        timeout server  50000
    errorfile 400 /etc/haproxy/errors/400.http
    errorfile 403 /etc/haproxy/errors/403.http
    errorfile 408 /etc/haproxy/errors/408.http
    errorfile 500 /etc/haproxy/errors/500.http
    errorfile 502 /etc/haproxy/errors/502.http
    errorfile 503 /etc/haproxy/errors/503.http
    errorfile 504 /etc/haproxy/errors/504.http

frontend raspberrypinodes
    bind *:80
    mode http
    default_backend nodes

backend nodes
    mode http
    balance roundrobin
    option forwardfor
    http-request set-header X-Forwarded-Port %[dst_port]
    http-request add-header X-Forwarded-Proto https if { ssl_fc }
    option httpchk HEAD / HTTP/1.1\r\nHost:localhost
    server raspberrypi01 192.168.1.200:8000 check
    server raspberrypi02 192.168.1.201:8000 check
    server raspberrypi03 192.168.1.202:8000 check

listen stats *:1936
    stats enable
    stats uri /
    stats hide-version
    stats auth someuser:password
Part 5.5 Tie it all together
Ok, now that we've saved our updates to the HAProxy config file (/etc/haproxy/haproxy.cfg), it's time to start HAProxy and see it in action!
- On the computer or pi with HAProxy, type:
sudo service haproxy restart - Go to the address of the pi (or localhost if using your own computer) in a browser:
- You'll notice that when you go to the address of the computer with HAProxy (no port is shown, which means the request is going to port 80 by default), HAProxy receives the request on port
80, and proxies it to port8000on one of your raspberry pis! - Try refreshing the page multiple times. You'll notice that it returns the request from a different raspberry pi each time (this is because HAProxy is using the RoundRobin strategy to distribute the load)
WOOOO! We now have a multi-node raspberry pi webserver that can accept requests at a single URL, but still proxy those requests to multiple back-ends.
This is roughly how things work at big web-sites: you hit a central web address, and your request gets routed to one of many servers, each of which can handle your incoming request.
Part 5.6: HAProxy stats
One last great thing I want to mention about HAProxy is that it comes with stats tracking. Since we added that stats section to our HAProxy config file, we should be able to go to the port we specified and see the stats on each of our raspberry pi servers.
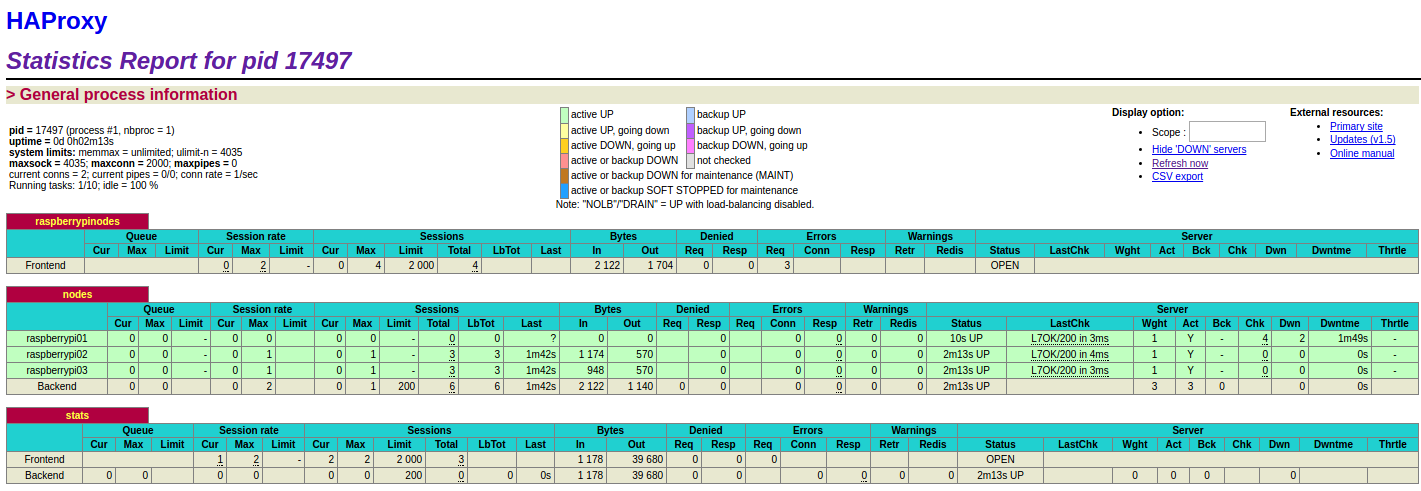
We can see that all 3 of our raspberry pi servers are green, which means they are healthy and running.
If one of them goes down, HAProxy will detect this, and will automatically stop routing requests to the downed server. Here's what that looks like:
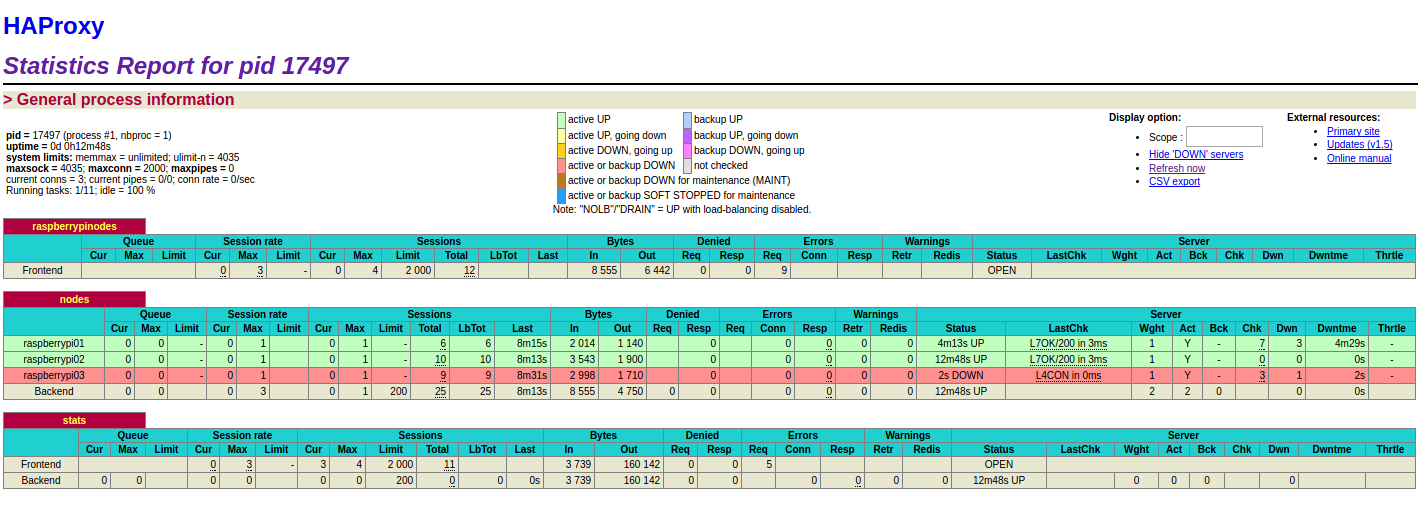
(Note that our 3rd webserver is dead, which HAProxy has detected). Once it comes back up, HAProxy will detect this, also, and start sending requests to that server again.
You now (hopefully) understand better how multi-node web servers are set up, and you know how to set up your own using raspberry pis (or multiple computers).